Making a strongback for mounting the forms
A strongback (the spinal cord) for mounting the forms is very important
and presents several challenges. It's difficult to find a straight
piece of 2x4 that is actually near 5 meters long.
Analysing the alternatives, I found the following options:
- 2x4's which are not too straight, and no garantee they'll keep
the actual form for a reasonable time. But economical!
- Nice and straight 2x4 beams of what is called 'compensated'
wood (actually selected and laminated), of good quality, but
quite expensive.
- Build a custom strongback using phenolic laminated wood.
- Use a metallic beam, but this presents problems for fixing the
the forms.
I finally decided to use the 'custom' strongback option, which came
out as costing about half of the laminated wood alternative. I selected
15 mm plywood. This alternative does imply you need a router.

|
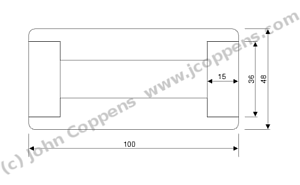
Here's a cut of the strongback, showing how the parts will come
together. Maybe it's possible to do with the cutouts, but these
do contribute a lot to the strength of the strongback.
 |
The local EASY sells the plywood in boards of 1.22 by 2.44 meters.
I needed only about half a board, but they only sell entire units.
Ah, well, I'll use what's left to make another sawhorse, which I
needed anyway. EASY has many rules like this... Another one is that
they don't cut narrower strips than 15 cm! This sabotaged my original
idea of taking advantage of their nice cutters to garantee parallel
cuts. The result was a slightly more complicated strategy:

|
Though the original idea was to let them cut all the horizontal strips,
which EASY's rules won't permit, I decided to cut a strip 159 mm wide
which will produce the 4 strips for the top and bottom, and two strips
of 205 mm each, which will provide the sides (100 mm wide).
In each case I calculated a 5 mm margin for each cut, and this
includes the EASY tolerance of 2 mm.
Before cutting the first strip, I had them make a narrow pass with the
machine to get a good initial reference.
 |
This is the best way I could figure to use the outer ('good') cuts
for the majority of the following operations. If you use a circular
saw, it may be necessary to foresee more than 5 mm between the strips!
|
I followed the steps as detailed in the sketch. It's not necessary
to pass the router to adjust the outer 100 mm border - it's easier
to assemble the strongback and the plane everything down.
On the drawing, 'Ref' indicates the side I used as a reference
(the side to use the slider of the router on). Also note that it
is advisable to do the last pass of the router with with less 'cut'
to obtain a better quality.
 |

|
On the drawing above, two of the narrow strips are marked to be cut at
610 mm, and one of the wider ones at 1220 mm. Doing this, lets me
combine the pieces in such a way none of the unions will coincide
with another one, like this:

I was following the instructions from the book, but, considering
the following experiences, I'm considering that scarping the pieces (instead of just glueing
them butt-to-butt, would have been worthwhile. If I do another
strongback, I will at least scarp the wider strips together!
|
The narrow strips were cut as described in this drawing. It's more
difficult to get all sides really straight, as both internal
strips don't have any original reference.
Maybe it would have been better to use the router to adjust the
strips, but I didn't have a router bit 15 mm high.
 |

|
Continues with
pictures of the strongback construction.
|
(c) John Coppens ON6JC/LW3HAZ |
mail |


