

Language:
Español
More info:
FAQ
Bibliography
Peperina team
Other kayaks
Links
Kayakers
Products
If the sprayskirt doesn't fail, rolls are perfectly feasable in this state, but, particularly during the learning process, sprayskirts do fail. Even though the floats will never let the kayak sink, the amount of water coming in is so large, it gets quite impossible to manage the boat, and a trip to shore is necessary.
As the S and G Guillemot was already closed, and access to the places where the hatches should go is difficult, the system used in hatches as used in the strip built Guillemot was almost impossible. The selected system, with a raised hatch, has resulted very effective, though somewhat involved to construct.

|
This drawing is to determine the inclination necessary, taking into
account the width of the cut, and the thickness of the sealing
strip. First I drew the deck and the (raised) hatch. Then I drew
a couple of wood strips separated with the correct distance for
the sealing strip. I then rotated this last drawing till it
touched both the hatch (outside) and the deck (inside). In the
next section are drawings for different deck angles.
|
|
|
|
|
|
|
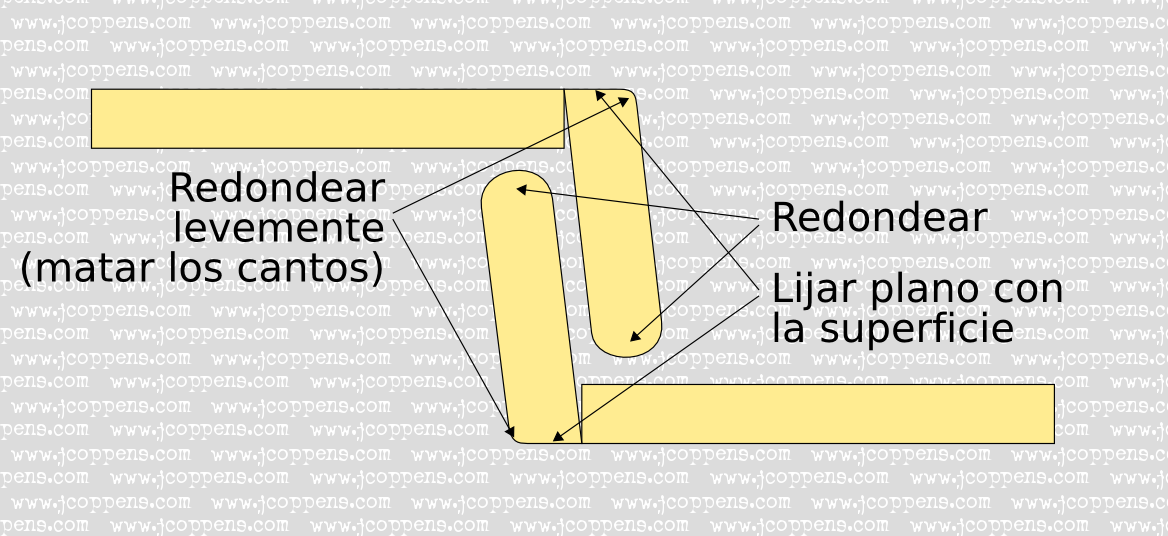
Once glues (with a couple of drops of fast-setting epoxy glue),
I sanded the top and bottom borders to be flush with deck and hatch.
Be careful not to unglue the strips.
|
||

|
|
|
|
Next step is applying glass cloth to reinforce the construction.
I covered the hatch completely, but the deck frame only received a
6cm wide strip. Once the fibreglass has been applied you can
use putty to fill out any spacing between frame and deck/hatch.
|
||
|
|

|
|
|
Finally, and after as many hands of sanding, epoxy and varnish as
deemed necessary, you can glue the sealing strip (I used 1.5mm
neoprene) preferably using (water-resistant) contact glue.
|
||
Below are a couple of drawing using angles which I measured on my boat. Yours might be slightly different, though probably near enough to use the drawings anyway. Of course, if you want to apply this method for another boat, you're on your own.

|
The construction if the deck were perfectly flat. A template made
according to this drawing is useful to align the wood strips of the
front and back of the hatch.
|
|
|
|

|
|
|
Construction of the sides of the frame, at the aft hatch.
|
||

|
|
|
|
The construction of the front hatch hatch frame.
|
||
If the work was realized with some care, you'll have hatches that close quite well. The ones described here survived (actually the next day) 5 hours of winds of more that 20 knots, and waves over 1 meters (which is quite a lot for our small lake). Not only were the hatches perfectly sealed, after opening them you could still appreciate the smell of the last coat of varnish.
Continues with phots of the construction (1) 17300| (c) John Coppens ON6JC/LW3HAZ |