

Language:
Español
More info:
FAQ
Bibliography
Peperina team
Other kayaks
Links
Kayakers
Products
Several people recommended using a slightly narrower profile for the blade, to ease longer distance paddling. I didn't want to try a hollow surface yet, I needed the new paddles in a hurry.
This one is made out of 'cove and bead' strips, using the same techniques as used for strip built kayaks. Each blade is about 10 strips wide (strips 51 cm long).
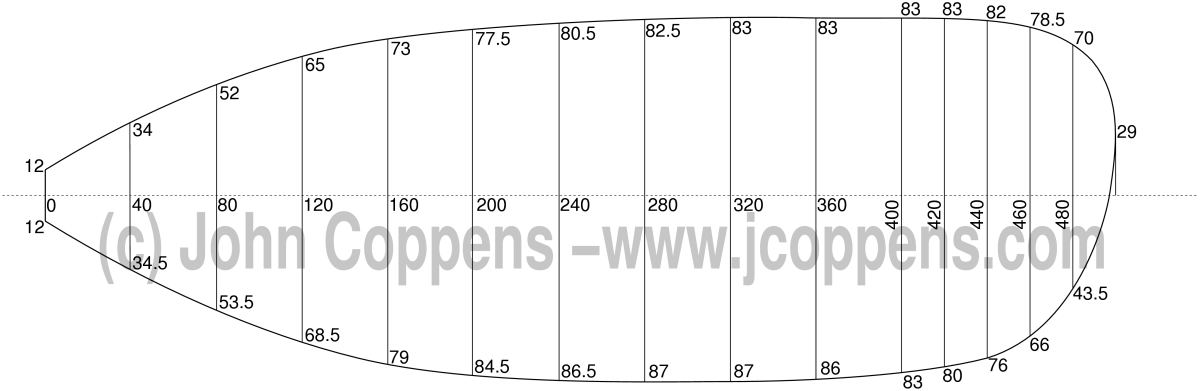
The form of the new blade.

|
The original plywood paddle blade shows a suspicious darkening. Here,
the blade has been cut lengthwise for the 'autopsy'.
|
|
|
|

|
|
|
The separated plies show the effects of the water filtration.
|
||

|
|
|
|
For the new paddle, I first glued enough strips together to get a
board out of which I could cut both blades (here without sanding).
As mentioned before, the wood is Timbo, excellent water resistance,
light, but a dust mask is necessary because of possible allergic
reactions.
|
||
|
|

|
|
|
Here's the board, now after sanding.
|
||

|
|
|
|
After more sanding, and with the blade design transferred.
|
||
|
|

|
|
|
The original paddle shaft was still in good shape, so I reused that.
Here I already removed the rests of the previous blade and sanded down
to the original wood.
|
||

|
|
|
|
The two blades, cut and ready to be glued onto the shaft.
|
||
|
|

|
|
|
A detail at the extreme of the blade. It's probably not necessary with
Timbo wood (which is very water-resistant), but it makes the blade
points more resistant mechanically, and to water filtration.
|
||

|
|
|
|
Glued to the shaft. The slight curve isn't really noticeable here -
it's the same form as in the previous design.
|
||
|
|

|
|
|
One blade surface was covered with a layer of fiberglass cloth.
Both sides received two coats of epoxy.
|
||

|
|
|
|
The cloth impregnated with resin, seems to disappear. Note that because
of capilarity, the resin distrutes to the border of the fibreglass,
effectively reducing the amount on the actual surface - this is why
cutting the cloth is important!
|
||
|
|

|
|
|
I had to finish the paddle for an upcoming excursion, and used a few
extreme techniques... not recommended: The electric heater, visible in
the previous picture, caused evaporation of gases in the wood, and
bubbles under the surface.
|
||

|
|
|
|
The finished blade (lacking varnish): the bubbles are visible, but the
camera's flash exaggerates them.
|
||
|
|

|
|
|
With natural light, the bubbles aren't nearly as visible.
|
||

|
|
|
|
The finished padde (two layers of epoxy, and two layers of two-part
poliuretanic UV-filtering varnish.
|
||
|
|

|
|
|
In daylight, the surface looks quite acceptable.
|
||
| (c) John Coppens ON6JC/LW3HAZ |