

Language:
Español
Preamplifier
Intro
Photos
Other info:
Links
Bibliography
Where are we?

|
Against all advice, I built this GaAsFET amplifier, and, after more than
8 years of faithfull service, it has never broken down. Many predicted
that it would be too sensitive to static.
The fact that it only has one coil, few stability problems, and
of course excellent results, more than justify the little extra cost
and care necessary to build it. |
|
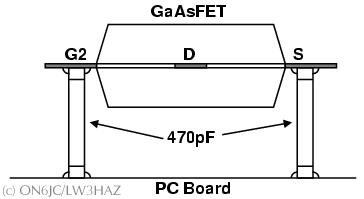
Mounting of the GaAsFET resting on (and soldered to) two surface
mount capacitors. |
|
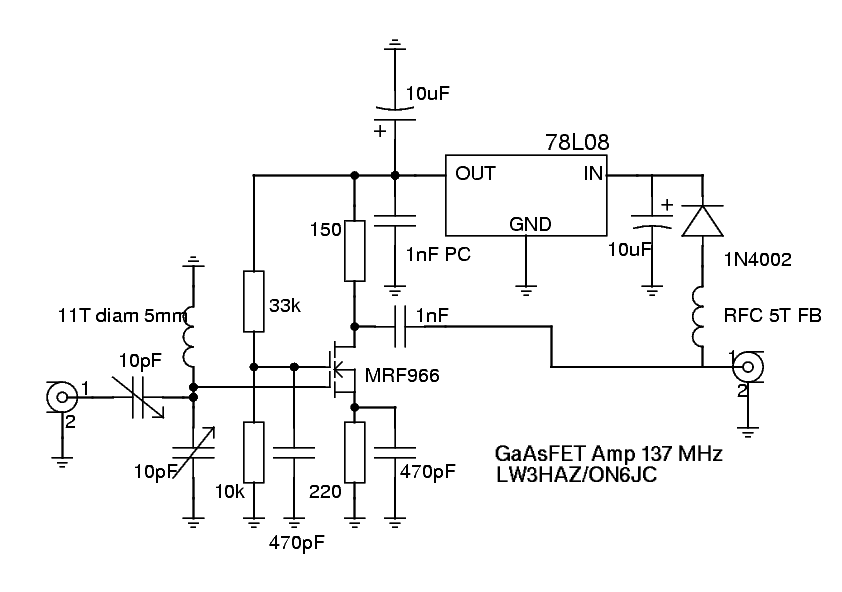
Power supply is brought in through the coax cable. If you have 12 V
available near the antenna it's possible to eliminate the coil and
the diode, and connect directly to the regulator input. (Click on the image to enlarge) |
| Components | Notes |
| 11T diam 5mm | Input coil. This is the single most important component of the entire circuit! If you can get silver plated wire, use it. Only as a last resort use tinned copper wire. |
| 10 pF (trimmer) | Both input variable capacitors should preferably be of the ceramic variety. Mica version will do, but in my experience have the tendency to corrode more easily. |
| 470 pF | I've used two 470 pF capacitors of the sourface mount variety. they are soldered vertically on the PC board, on both sides of the transistor, so that the transistor is supported by them. |
| 1nF PC | This is a passthrough capacitor, mounted on the vertical separator. Many asked for this type of capacitor - they are not easy to obtain, but I'm sure this one could be replaced by another SMD capacitor |
| RFC 5T FB | A homebrew choke, made by winding 5 turns on a ferrite bead. |
| MRF 966 |
This transistor is very sensitive to static discharge!
Best thing to do is finish the rest of the circuit first, preparing
the correct separation between the 470 pF caps, the complete input
and output circuit, so that in a single operation, the FET can be
put into place. Soldering guns are particularly unsuited! Take the circuit in one hand, and the transistor in the other. Put it in place. Unplug the soldering iron, and quickly solder the four terminals. |
| 78L08 | An 8V voltage regulador, low current version (100mA) |
| (c) John Coppens ON6JC/LW3HAZ |