

Language:
Español
More info:
FAQ
Bibliography
Peperina team
Other kayaks
Links
Kayakers
Products
It's mainly sold as a cover for (interior) doors. Here it is available in panels around 1.6 m wide and just over 2.1 metres long. Most providers have them in 3 and 4 mm thickness.
On one side is the higher quality type of wood one pays for. The other side and in between, are cheaper woods of very different colors.
The cheapest kind is probably pinewood, though cedar sold for the same price where I bought it. Other kinds were too expensive for this proyect. The pine panels were of very inferior quality. They even let the light pass through, indicating that the middle layer was missing... Watch out!
Trying to select three panels of the same colour and texture is daunting. I tried and, after applying epoxy found they changed colour completely.
Mechanical strength will be provided by the glass and epoxy. If you like, use the 3 mm panels. I choose the 4 mm, mainly because I am a beginner... (And the price didn't differ too much)
Do check the other side, and check the borders to see if the middle layer is continuous.

|
The techinique to realize a strong joint between two pieces of wood
is called scarping, and this is done by overlapping the parts by at
least 8 times the thickness of the plywood. To get the right
angle more easily, I used the 'ramp' technique as pictured below.
The plates (now 80cm by about 220cm) are piled up, with the short borders displaced by 8 times the thickness - in my case 32 mm - each. MIND the correct order of the pieces! After planing and sanding, they have to be rotated to fit onto esch other with the 'good' side up. So it's necessary to think about the correct order before starting to plane. |

|
The panels normally bear a seal from the manufacturer in one of the
corners, indicating thickness, quality, wood, and origin.
|
|
|
|

|
|
|
On the 'bad' side, frequently serious errors are corrected by the
manufacturer (like this cut).
|
||

|
|
|
|
Sometimes the problem is not corrected, like this spot. Check if the
problems have a solution... before buying!
|
||
|
|

|
|
|
First step is cutting the three panels lengthwise. Press them together
with the good sides in, to protect them while cutting. This results
in six panels, 80 cm wide and 2.1 metres long.
|
||
|
|
|
|
Pressing them is important, this helps to make a clean cut at the good
side.
|
||
|
|

|
|
|
To obtain 5.2 metre panels, it's necessary to join the pieces in a special
way, called scarfing. To make the union as strong as the rest of the
panel, the joint must be at least 8 times the thickness (24 mm for 3mm
ply, 32 mm for 4 mm plywood).
|
||

|
|
|
|
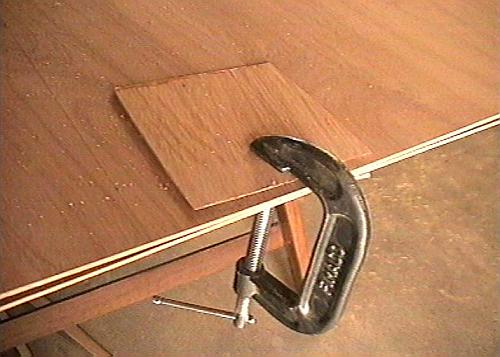
This is NOT easy! Think a lot about which side of each panel must be up.
Some of them must be turned before gluing. Adding a piece of scrap wood
make a staircase with 24 or 32 mm wide steps.
|
||
|
|

|
|
|
The idea is progressively converting this staircase in a slope. Most
of the wood can be removed using a plane. Termination must be done
using a (preferably) belt sander or manually. Always sand in the
direction of the 'good' wood's grain
|
||

|
|
|
|
Finish using the sander, and 50 grain then 80. Try to maintain
the border as straight as possible.
|
||
|
|

|
|
|
Then it's time to glue them together. Though it's possible to use
ordinary glue (it will be protected by epoxy later), I prefer using
special epoxy wood glue, or, simpler, just mix a batch of clear epoxy. I'd suggest mixing 10% of
talc to strengthen the joints.
|
||

|
|
|
|
In one session, I glued all panels. To avoid glueing them together, I
sandwiched in 'Saran'-style kitchen foil. This doesn't adhere to the
epoxy once hard. More film below and above, and a piece of wood,
and then enlisting help of everything heavy: bags of cement, paint
and other weighty elements.
|
||
| (c) John Coppens ON6JC/LW3HAZ |