

Language:
Español
More info:
FAQ
Bibliography
Peperina team
Other kayaks
Links
Kayakers
Products
If you don't (have space), use the forms carefully. After applying the fillets, the halves become very rigid, and it won't be easy to join them. Tell me...

|
The bottom part of the kayak, in its forms. After this, I decided to
remove the wires and sand the borders at an angle to make them fit
better. Then I re-stitched them.
|
|
|
|
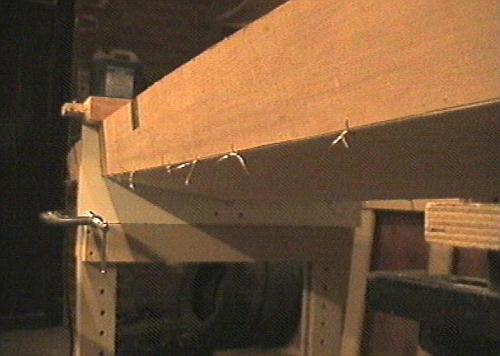
Do not skip holes, like I did here. The time saved by not putting in a few stitches, will be lost later by having to sand more (ask Murphy). |
|||

|
Before applying the putty (epoxy+talc), push in the wires with a
screwdriver. You'll need less filleting to cover the wire. The copper
wire is almost invisible in the picture.
|

|
|
|
It's difficult to maintain the glass strip in the corner, so I used the stickyness of the nearly hardened fillet to 'glue' the strip in place. |
|||

|
After the fillet hardened, saturate the glass strip (about 6 cm wide).
I used the moment to paint the interior completely a first time.
|

|
|
|
Mind... When applying the fillets, it's very important to maintain the shape of the hull or bottom. Use tape, forms, weights, clamps to assure the correct form. |
|||

|
Particularly, bow and stern want to lean down, and close up. I used these
separators to help. Even then, I had to apply a lot of force to make
both halves meet!
|

|
|
|
I felt a lot more secure making the deck half. The process is the same as the bottom. |
|||

|
There was a lot of resistance, trying to close the deck near the cockpit.
Finally, I left out several stitches in the area where the hole would be
later.
|

|
|
|
Excessive force almost broke the union, so I had to add a clamp. But with the experience acquired making the bottom, the filleting came out near perfect! |
|||

|
Once hardened, the wires can be removed. Pulling out is almost impossible,
so I cut them as near the surface as possible.
|
|
|
|
Filleting in the stern/bow area is difficult. It's important to try though, as these are vulnerable points. |
|||

|
Even though experts don't mention it, I decided to put in a layer of glass
cloth around the cockpit area. I used the ocasion to get a bit of experience
before starting the outside covering.
|

|
|
|
I removed a few weaves, to obtain a neater termination. |
|||

|
And I tried NOT to fill the texture completely to get a small anti-slip
zone. Mind: DO saturate the cloth. Just don't cover it with resin.
|
||
| (c) John Coppens ON6JC/LW3HAZ |