- In the Surface of Revolution, the math formula describing the curve must result in only one value (an ordinate) for each input datum (abscissa). This means that you cannot describe forms which return on themselves, such as tubes or glasses with a certain thickness, or even a torus). Only a Lathe object can create those objects.
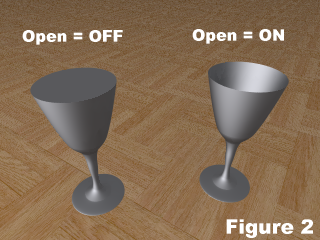
Of course you could generate a glass with a SOR, declaring it as 'Open', but the walls would have no thickness in this case. The bottom (support) of the glass would have to be open too in this case - not a very realistic scenario.
- In both cases, it will be necessary to edit the coefficients which determine the form of the curve. However, in a Surface of Revolution, there is only one option - splines which describe the points through which the curve will pass. In the Lathe, there is a selection of modes: linea, cuadratic, cubic and Bezier splines. Particularly the Bezier splines are much more intuitive.
So, in conclusion, is the majority of cases, the Lathe is capable of everything the SOR does. Why use the SOR then? The math describing this kind of objects is simpler, and the rendering times are correspondingly shorter.
Choosing one or the other is more a matter of strategy than a technical one: if sufficient computer power is available, or the scenes are rather uncomplicated, there is little reasone to go for SOR. As can be seen from Fig. 3, SOR and Lathe share a lot of the same philosophy:

Spline type (Lathe): Here we select which type of curve we want to use for describing the surface of our object. There are four possibilities:
Editing the spline points is common to both Lathe and SOR. By default, a number of points are pre-defined when selecting an object. Inserting new points can be done with the insertion buttons to the right of the table. Note that in case of the Bezier spline, it is necessary to insert points in 'threes' (the actual point, and two points to determine the curvature of the previous and next segments.
To edit the values, it is frequently more convenient using the mouse to move the control points around (at least approximately) to obtain the desired form. To have more precise control, it is possible to edit the values in the table too.
Some not so evident editing tricks:
Left button permits selecting a number of control points
and move them simultaneously.
Ctl+Left permits toggling single control points
Shift+Ctl+Left btn permits adding to the selection of
multiple control points.
Note that, to obtain a really closed curve, the first and last control points must be identical.
Open: (SOR) By default, an object created by a SOR is closed, or solid. If you want it to be empty (like a simple tube), this option must be set. Note that there is no real wall thickness in this case. See Fig. 02, above.
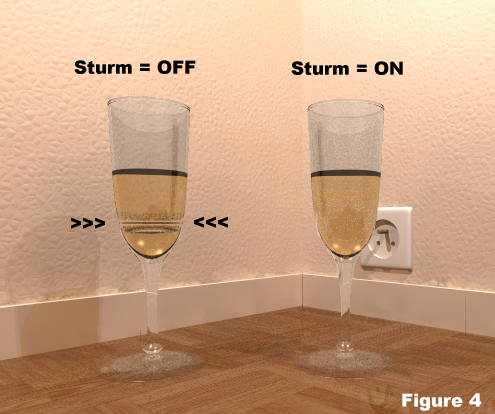
Sturm: (SOR, LATHE) This option modifies the algorithm used to calculate the rays. In some cases the default algorithm fails and some artifacts appear in the rendering (see Fig. 04). Enabling the Sturm option eliminates this problem, but slows down calculations.
The other options are common to other types of objects, and we'll quietly skip them here.
5698| (c) John Coppens ON6JC/LW3HAZ |